Showing posts with label special effects. Show all posts

Monday, 2 December 2013

Practical Source of Inspiration

WOUNDS.

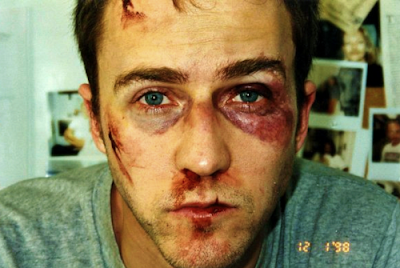
Fight club (1999)

I was inspired by the movie makeup in the 1999 film 'Fight Club'.
In particular, the special effects cuts and wounds.


To recreate the wounds seen in fight club, I used:
  • Liquid Latex
  • Fake blood
  • Acrylic paints

1. I applied the liquid latex to the areas where the wounds would be:
(When dry, the latex is clear:)
2. Using scissors, I cut into the latex:
3. I then painted into the 'wounds' using red, blue and brown acrylic paints:
I did the same for the other 'wounded' areas:
4. Using a sponge, as well as simply pouring it on, i added fake blood to the wounds.  I also used the fake blood to create a nose bleed effect, inspired by the image from 'Fight Club' seen above.


Strengths
My strengths centre around the creative arts.  I believe that this will be helpful to my group as I can storyboard clearly and create special effects such as those demonstrated above.

Sunday, 1 December 2013

Fatal Wounds Makeup

For this practical tasks I used special effects to create strangulation marks and a slashed wrist.


Strangulation Marks

I used this video as a guide as I have never done this makeup before:


As I did not have the same materials as the person in the video used (a bruise wheel) I used cosmetic products instead such as dark lipsticks and eyeshadows. I started by putting some of these products on my hand and placing my hand on my neck in a choking position. After I had marked out where the most prominent bruising would be, I applied more of the products and blended them to get this result:


Slashed Wrist
I did not use an online tutorial for this as I have experience in creating this kind of makeup. I first used eyelash glue to create the shape of the cut on my wrist:


 When the glue was tacky I used a cocktail stick to draw a line down the middle so that when the glue had dried the cut would be visible. I also used the stick to push the edges of the glue away from the 'cut' so they would look like raised skin. Then I used dark red and purple cream products to fill in the cut:


To finish, I applied a blood red cream product to the cut to make it look more realistic, then added fake blood to get this result:


Evaluation
What went wrong:

  • I did not have all the products used in the strangulation marks tutorial so I had to use cosmetic products which did not look as realistic
  • I did not have as much fake blood as I had anticipated beforehand so I had to improvise and make my own with cosmetic and household items, which again did not look very realistic
To improve:
  • Ensure that I have the necessary products needed beforehand so the outcome is as successful as possible
This task is useful because special effects makeup will be used in our group's film opening, so we can refer to this post to see what kind of wounds could be used on the actors in our piece.

Wednesday, 13 November 2013

Movie Makeup

Fake wounds

I have already made an attempt at creating fake wounds, however, as our group is looking into the psychological horror genre, I felt that larger, more open wounds would be necessary.
(Previously, I looked at more scrape-like injuries that one might obtain from being a fight.  I want to create knife woulds.)


  • I used a similar method to before, by first applying liquid latex.
  • However, this time I also layered on tissue within the latex to create a thicker layer.


  • Once this dried, I used tweezers to tear into it.
  • As I had created a thick layer, it was easier to create a much deeper wound.


  • I then used acrylic to create a scabbed effect around the edges of the wound.  This also adds depth to it.
  • A lighter blood colour was also used to create the first layer of blood, before I poured fake blood into it.

  • Then I simply poured fake blood into the wound and allowed it to spill and drip down as it naturally would.
  • I also poured fake blood around my mouth, as bleeding from the mouth would be a result of such a wound.

Overall, I feel that this was a successful experiment and this skill will be useful when creating our opening sequence.
However, I think that I should continue to attempt to create bigger wounds in order to get the reaction that we want from our audience.

Wednesday, 9 October 2013

Practical Source of Inspiration

I was inspired by the special effects makeup used on Edward Norton to create bloody cuts and bruises in this still image from the film Fight Club (1999):


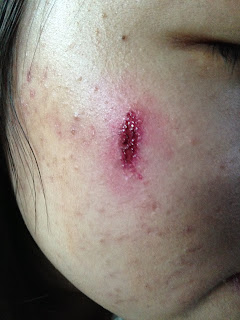
After seeing this image I decided to create similar special effects (specifically a fresh black eye and a cut) with cosmetic makeup on a model.


For the black eye I layered purple and dark red lipstick over the eye area to make the wound look fresh and used black and dark brown eyeshadow on the outer edges to create a bruising effect.


For the cut I put a thick strip of eyelash glue on the model's cheek. When it started to dry, I used a toothpick to pick the centre apart. This made the edges of the glue raised like the edges of a cut.


 After the glue had dried fully, I filled the centre with a dark purple lipstick and a red lipstick. To make the wound look more realistic I applied a dark brown eyeshadow and a clear gloss on top to simulate a fresh cut just starting to heal.


My strengths:

  • I have created special effects makeup before so I have experience
  • I was able to work with limited supplies in a short amount of time
Difficulties I faced:
  • Special effects makeup was not available to me so I had to use cosmetic makeup
  • I had a limited amount of time to create this makeup